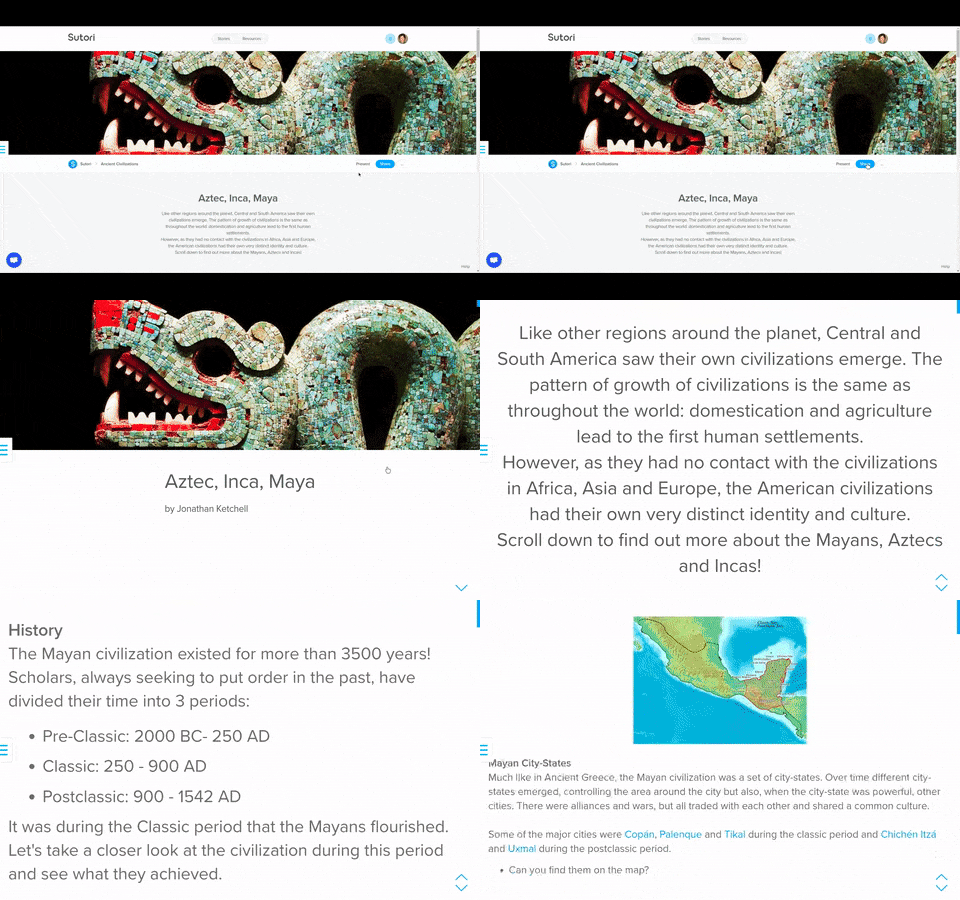
What if you could merge a timeline and a presentation tool? Match the linearity of events on a timeline with the focus of a presentation slide? Having a tool in your classroom that can do both at once not only saves precious time, but also opens up a new kind of learning assignment for your students. Let’s take a closer look 🙂
What is a timeline presentation template?
A timeline provides the canvas to add dates to key events. More than that, it enables us to make connections, to understand causality and how a sequence of events can lead to another.
To add meaning - to further deepen understanding - it is sometimes necessary to provide more context. With the help of a written explanation - in addition to an image, audio, video - students can fully grasp the topic.
Having a tool that enables you to focus on a particular event, one at a time, is therefore crucial to grasp that deeper understanding.
Sutori provides this, a blend of a classic timeline and Google Slides or PowerPoint.
3 ways of using timeline presentation templates in the classroom
Sutori is a flexible tool adapting to your teaching and not the other way around. Here are 3 ways you can use it in the classroom:
- Learning resource:
Add text, media and all kinds of interactivity to a resource on the topic of your choice. You can then share this with your students and get them to watch the videos, read the content, answer the quiz questions etc. in class or at home. If your students create accounts on Sutori, they can add comments and engage further in the content.
- Template for student presentations:
Set up a template so that students have a framework from which to create their projects. Feel free to use one of the templates (a selection comes up before you begin creating) that you can edit at will. You can also get your students to create a presentation from scratch.
- Collaborative presentations:
Create a timeline, invite groups of students or the whole class to get everyone involved. Students can also set up their own collaborative stories for easy group work.
Timeline presentation mode
Once you have added your dates, explained more in-depth and added media to your timeline, click on the “present” button. This opens up the presentation mode, displaying a timeline item full screen, allowing for easy navigation from one item to the next.
This is great for explaining the content to students in class or remotely via a video call. But why not get your students to showcase their learning in front of class?

Timeline presentation template example
Check out the template below, scroll through, watch the video, do the quiz, click on “Present”. When creating on Sutori, everything saves automatically!
Create a timeline presentation template yourself
Head on over to Sutori’s timeline presentation template, click on “Create your own” and then you’ll be prompted to create a free Sutori account. You can then start working from the template in a matter of minutes.
Some advantages with using Sutori:
- Easily add videos, images and audio files to your project
- Embed any file or web link
- Use the “Present” function to bring the presentation to life
- Build interactive quizzes and polls for engagement
- Develop peer review skills with comments
- Export to PDF or embed it directly into your website
All that is required is an internet connection! Sutori works on all common web browsers (Chrome, Firefox, Safari, Edge). There is a paying and - generous - free version of the tool 😊
Summary
Teachers love how flexible Sutori is for their teaching, while students get excited at using a modern, easy-to-use tool that helps them express their learning in varied ways. The combination of a timeline and presentation tool means you no longer have to choose between one and the other, streamlining the learning process and reducing friction for all.
What are you waiting for? Bring timelines presentations to life and make learning personalised. Sign up for free now 😃


